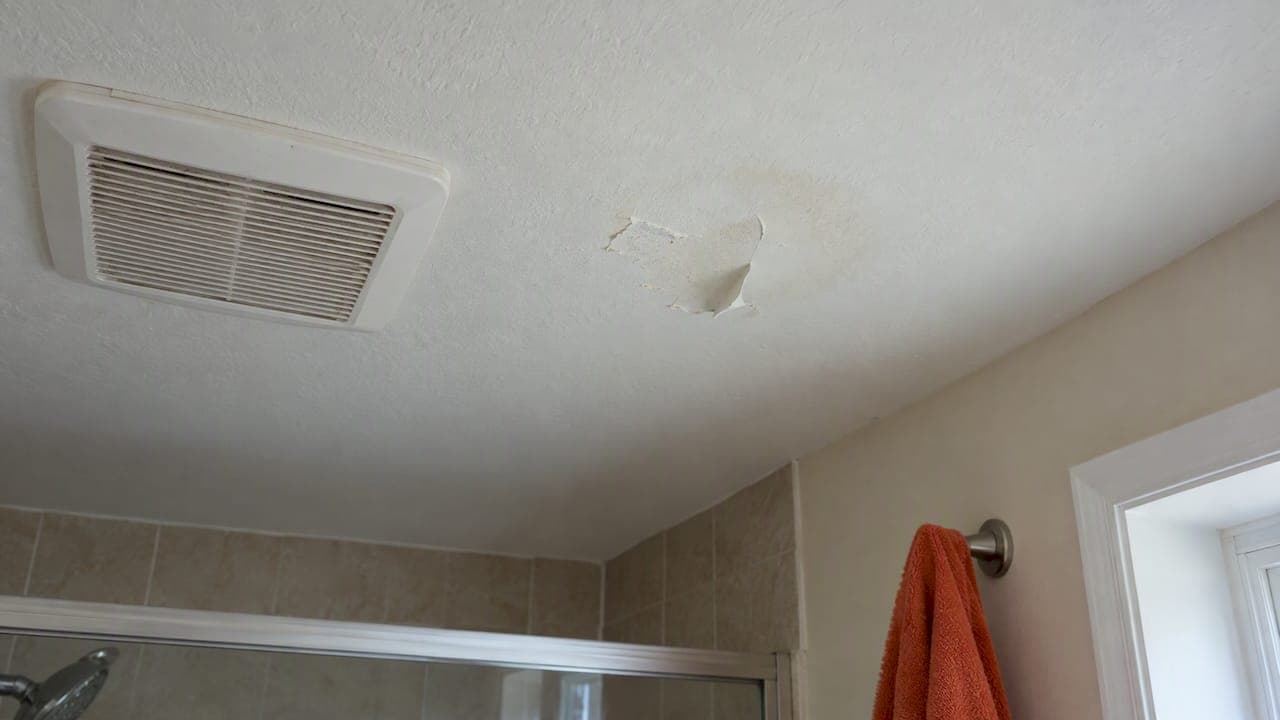
Most bathroom ceiling peeling comes down to moisture: steam from showers works its way under the paint film and breaks the bond. If you suspect an active leak from a pipe or the roof, stop using the room until it's checked. Otherwise, dry the area, improve ventilation, and follow the repair steps below: strip loose paint, dry the substrate, prime with a moisture-blocking primer, and repaint with a paint rated for high humidity. Run your exhaust fan for 20 to 30 minutes after every shower to keep it from coming back.
TL;DR:
- Peeling directly above the shower points to condensation, while isolated seasonal patches, staining, or soft drywall suggest a roof or plumbing leak; check attic conditions and timing.
- Widespread wet drywall, bubbling across a large area, or sagging requires you to stop using the bathroom and call a plumber or roofer immediately.
- After ruling out leaks, scrape loose paint, fully dry and repair the ceiling, prime with bathroom moisture blocking primer, then apply humidity rated paint.
- For bathrooms under 100 square feet, HVI recommends 50 CFM minimum; larger rooms need 50 additional CFM per fixture, while jetted tubs need 100 CFM.
- Keep indoor humidity between 30% and 50%, and run the exhaust fan for at least 20 minutes after showers; a timer helps maintain the routine.
Table of Contents
- Why Bathroom Ceilings Peel: Humidity, Prep Mistakes, and Leaks
- Is It Ventilation or a Leak? How to Tell and How Bad It Is
- A Step-by-Step Workflow for Fixing Peeling Bathroom Ceiling Paint
- Ventilation Upgrades and Daily Habits That Stop It Coming Back
- What Thorough Prep Actually Looks Like on a Real Job
- What Actually Matters Here
- Hire Tru Painting for a Bathroom Ceiling Repair That Lasts
- FAQ
- Sources
Why Bathroom Ceilings Peel: Humidity, Prep Mistakes, and Leaks
Peeling paint is almost always a moisture story. Every hot shower sends steam straight up, and when it condenses on a cooler ceiling, that moisture sits right under the paint film until the bond fails. The EPA's mold and moisture guidance points to relative humidity above 60% as a real risk threshold, and recommends keeping indoor humidity between 30% and 50% instead.
Humidity isn't the only culprit, though. A rushed paint job can fail just as fast as a steamy one.
- Painting over a surface that wasn't fully clean or dry sets the new coat up to fail from day one.
- Using a standard wall paint instead of one formulated for moisture leaves the film vulnerable to the next hot shower.
- Painting over mold without addressing the moisture source almost guarantees it comes back, something the EPA is specific about: clean and dry first, never paint over mold.
Leaks tell a different story on your ceiling. A slow pipe leak or a roof problem that lets water into the attic above your bathroom tends to show up as a stain or a soft patch in one spot, often away from the shower itself. The EPA's moisture control guidance for buildings walks through how moisture travels through walls and ceiling assemblies, which explains why peeling sometimes shows up far from where the water actually entered.
Is It Ventilation or a Leak? How to Tell and How Bad It Is
Where the peeling shows up on your ceiling is your first real clue. Paint failing directly over the shower or tub almost always points to steam and ventilation, since that's where condensation lands hardest. Peeling near a low wall, in a corner, or in a spot that only shows up seasonally is more likely tied to a pipe or roof leak.
A few quick checks will tell you more:
- Run the shower hot for 10 minutes and watch where condensation collects and drips.
- Check the attic above the bathroom, if you can access it, for staining or damp insulation.
- Press gently on the soft-looking drywall; if it gives or feels spongy, moisture has been sitting there a while.
- Notice any musty smell, which often shows up before visible mold does.
Pro Tip: Keep a simple log of when peeling gets worse. If it tracks with shower use, that's ventilation. If it shows up after rain regardless of shower habits, think roof or plumbing.
Severity matters for how fast you act. Light surface flaking is a low-urgency cosmetic fix. Peeling concentrated in one patch is moderate and worth addressing soon. Widespread wet drywall, bubbling across a large area, or any sagging means you should stop using the room and call a plumber or roofer immediately, since that points to an active leak rather than simple condensation.
A Step-by-Step Workflow for Fixing Peeling Bathroom Ceiling Paint
Once you know what you're dealing with, the repair itself follows a predictable order. Skipping steps, especially drying time, is the most common reason ceiling paint fails again within a year.
- Confirm there's no active leak. If you found signs of a pipe or roof leak in your diagnosis, get that fixed first. Painting over an active leak just hides the problem temporarily.
- Strip all loose and flaking paint. Scrape back to solid material and inspect what's underneath for soft spots or mold while you're at it.
- Dry the area completely. Run fans and a dehumidifier, and give it real time, often a full day or more depending on how saturated the drywall got.
- Repair the substrate. Patch or replace damaged drywall, and handle any mold per EPA guidance: clean, dry thoroughly, and remove porous materials that are badly contaminated rather than painting over them.
- Prime with a moisture and stain-blocking primer built for bathrooms, not a general-purpose primer.
- Repaint with a humidity-rated paint, applying thin, even coats and letting each one cure with the fan running before adding the next.
A few things make the difference between a repair that holds and one that doesn't:
- Confirm dryness before priming; a quick way is checking that the patched drywall feels cool and firm, not cold or damp, to the touch.
- Never skip the primer step even if the paint claims to be self-priming for stains.
- Keep ventilation running through the entire drying and curing process, not just during the shower.
The EPA notes that high relative humidity above 60% significantly raises the risk of moisture damage, which is why drying fully before you repaint matters more than the paint you choose according to EPA guidance.
If the damage covers more than a small patch, involves structural softness, or keeps coming back after a DIY fix, that's the point to bring in a contractor. A proper scope includes full removal of failed material, substrate replacement where needed, thorough drying before any paint touches the surface, and a workmanship warranty. For a deeper look at replacing damaged sections, our guide to water stain ceiling repair walks through what that looks like.
Ventilation Upgrades and Daily Habits That Stop It Coming Back
Even a perfect repair peels again without the right ventilation behind it. The Home Ventilating Institute sets a minimum of 50 CFM for bathrooms, using a baseline of 1 CFM per square foot for rooms under 100 square feet. Larger bathrooms need more: add 50 CFM for each additional fixture like a shower, tub, or toilet, and a jetted tub calls for 100 CFM on its own.
Run time matters as much as fan size. HVI recommends keeping the exhaust fan running for at least 20 minutes after you finish showering, long enough to actually clear the moisture rather than just the smell.
- A timer switch takes the guesswork out of run time and shuts the fan off automatically.
- A humidity-sensing fan kicks on and off based on actual moisture levels rather than a light switch.
- Ducting the fan straight outside, rather than into an attic space, keeps moisture from just relocating.
Pro Tip: Crack the bathroom door slightly while the fan runs if there's no dedicated makeup-air vent; the fan needs fresh air coming in to push moist air out efficiently.
Day to day, run the fan during the shower and for the full 20 to 30 minutes after. For more on managing humidity throughout the house, see our piece on keeping humidity in the 30% to 50% range.
What Thorough Prep Actually Looks Like on a Real Job
When we scope a bathroom ceiling repair, prep is where the real work happens, not the paint. A contractor-grade job includes full removal of failed paint, substrate repair or replacement where drywall has taken on moisture, mold remediation rather than a quick wipe-down, the right primer for the surface, and finishing coats built for a humid room.
- We assess whether the damage calls for a Cosmetic Refresh or a deeper Enhanced Prep & Durability approach.
- Maximum Prep & Protection is worth considering for bathrooms with a history of repeat peeling.
- Prep level drives how long a repair actually lasts, far more than the paint brand on the can.
If plumbing is part of the picture, PSV Plumbing's guide to preventing bathroom mold covers the moisture-control side from a plumber's perspective.
What Actually Matters Here
The advice to "just use better paint" misses the point entirely. Paint is the last five percent of this problem, not the first. We've seen plenty of ceilings repainted with a premium moisture-resistant product that peeled again within a year because nobody fixed the ventilation or gave the drywall time to actually dry.

The homeowners who get this right do the unglamorous part first: they figure out whether they're dealing with condensation or a leak, they let the substrate dry fully even when that means living with an unfinished ceiling for a few days, and they fix the fan situation before they ever open a paint can. Skipping straight to repainting is the conventional move, and it's exactly why so many bathroom ceilings need a repaint every year or two instead of every decade.
If you take one thing from this, prioritize the diagnosis over the product. The right primer on a damp ceiling still fails. A cheap fan that actually runs long enough after every shower beats an expensive paint job on a ceiling that never dries out between uses.
— Kyle
Hire Tru Painting for a Bathroom Ceiling Repair That Lasts
We handle bathroom ceiling repairs the way we'd want them done in our own homes: full prep, proper drying time, and a finish built to hold up in a humid room. Our services include interior painting, drywall repairs, and specialty coatings, along with flexible prep and protection packages for ceilings with a history of repeat peeling.

A thorough estimate includes an inspection of the moisture source, a clear scope of work, and the materials we'll use, so you know exactly what you're paying for before we start.
- We inspect, diagnose, and scope the repair before providing a quote.
- The prep package is matched to the amount of damage the ceiling has.
- Scheduling is coordinated to minimize disruption and help get the bathroom back in use as soon as possible after the finish cures.
Ready to get a real look at your ceiling? Request an estimate with Tru Painting and we'll take it from there.
FAQ
How do I fix peeling paint on a ceiling?
Scrape away all loose and flaking paint, dry the area completely, repair any damaged drywall, prime with a moisture-blocking primer, and repaint with a paint rated for humid rooms. Skipping the drying step is the most common reason the fix doesn't hold.
Do you need special ceiling paint for a bathroom?
Yes, a paint formulated for high-humidity areas holds up far better than standard wall paint in a bathroom. Satin or semi-gloss finishes are generally easier to wipe down and more resistant to moisture than flat finishes.
Why is my bathroom ceiling growing mildew?
Mildew in a bathroom ceiling almost always means moisture is sitting on the surface longer than it should, usually from weak ventilation. The EPA recommends cleaning and fully drying the area, and never painting over a mildewed surface without addressing the moisture first.
How do I stop paint from peeling again after I repaint?
Keep indoor humidity between 30% and 50%, and run your exhaust fan for at least 20 minutes after every shower, per HVI guidance. A timer switch or humidity-sensing fan makes this consistent without relying on you remembering every time.
When should I call a professional instead of fixing it myself?
Call a contractor when the damage covers a large area, the drywall feels soft or spongy, or the peeling keeps coming back after a DIY repair. At that point, full substrate repair and proper drying likely need equipment and time beyond a weekend project.
Sources
- A brief guide to mold, moisture and your home | US EPA
- How much ventilation do I need? - Home Ventilating Institute