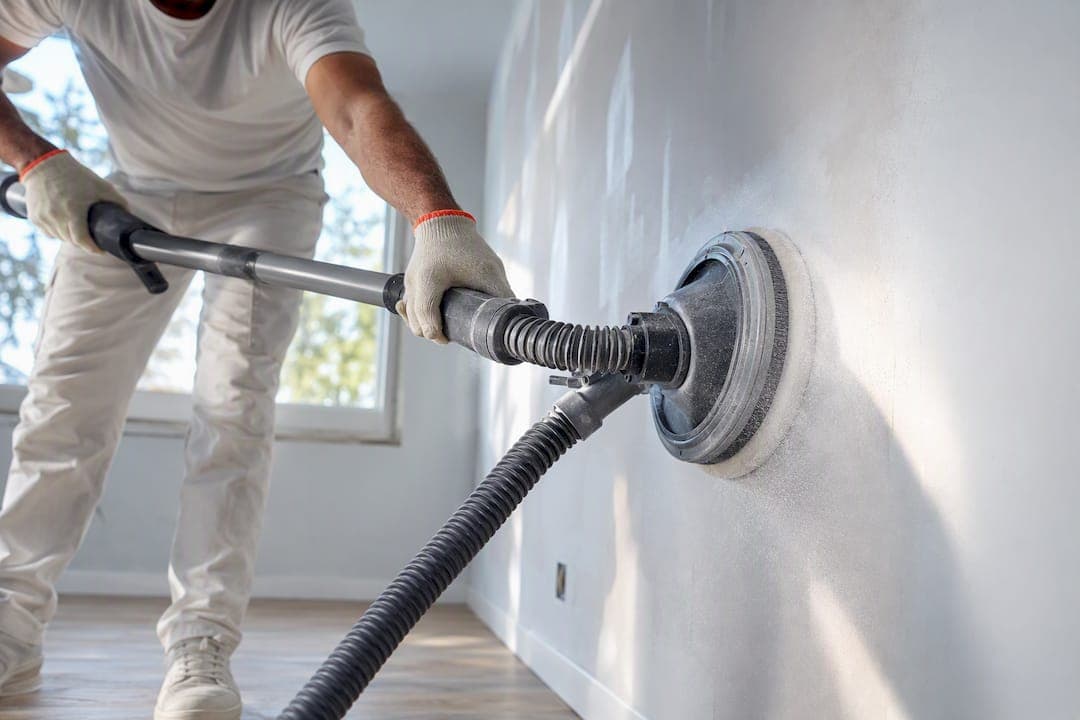
Vacuum-assisted sanding with mesh abrasives, a HEPA extractor, and a P100 respirator cuts airborne drywall dust far more than hand sanding or a standard shop vac. For whole walls and ceilings, that combination is your best bet. Small patches can skip the machine entirely with a damp sponge. Either way, don't sand without eye protection and a proper respirator.
TL;DR:
- Using vacuum-assisted sanding with HEPA extraction and mesh abrasives can remove up to 95 percent of drywall dust, significantly reducing airborne particles.
- Proper setup requires snug hose connections, an automatic filter cleaning extractor, and testing suction before starting to ensure optimal dust containment.
- For small patches, hand sanding with a damp sponge produces minimal dust, while machine sanding benefits from mesh abrasives and fine-dust collection tools.
- A P100 respirator and full containment measures, such as plastic barriers and exhaust fans, are essential for health protection during dustless drywall sanding.
- Renting professional equipment for entire-house projects often saves time and achieves cleaner results compared to DIY setups, especially when high-gloss finishes are involved.
Table of Contents
- What Is Dustless Drywall Sanding, Exactly?
- What Vacuum Setup Actually Captures Drywall Dust?
- How Should You Sand Drywall Without Cutting Through the Paper?
- What PPE and Room Prep Do You Actually Need?
- A Step-by-Step Dustless Sanding Workflow
- Common Dustless Sanding Problems and How to Fix Them
- Field-Proven Tips From Painting Professionals
- How Much Does Dustless Sanding Equipment Cost?
- How Do You Maintain a Dustless Sanding Machine?
- Is Dustless Sanding Better for the Environment?
- How Do You Choose the Right Setup for Your Project?
- Dustless vs. Traditional Sanding: What You Gain and What You Give Up
- Perspective: When DIY Makes Sense and When It Doesn't
- Sources
What Is Dustless Drywall Sanding, Exactly?
Dustless drywall sanding isn't a single tool. It's a system: a sander (or hand tool) paired with dust extraction that captures particles at the source instead of letting them scatter across the room. The industry term for this is "dust-extraction sanding" or "vacuum-assisted sanding," and you'll see both phrases used interchangeably with "dustless" in product listings. None of these methods are perfectly dust-free. Even top-tier professional setups let a small amount of fine particulate escape, so containment and respiratory protection still matter no matter how good your extractor is.
The payoff is real, though. Attaching a sander to a shop vac can keep up to 95 percent of sanding dust from becoming airborne when the setup is done correctly. That's the difference between a light wipe-down and spending your Saturday afternoon vacuuming dust out of your ceiling fan blades.
Picking the right tool for the job
Your choice of sander depends on room size, your budget, and how much finish quality you need. Here's how the main categories stack up:
- Sanding sponge or hand block: best for small patches, inside corners, and touch-up work where a machine is overkill. Sponges also work wet, which eliminates dust almost entirely on repairs under a square foot or two.
- Manual pole sander with vacuum port: a solid middle ground for DIYers tackling a full wall or ceiling without buying a powered rig. It connects to a shop vac hose, though suction is only as good as the seal at the head.
- Powered pole sander (corded or cordless): the fastest option for whole rooms or multiple rooms, and the choice most contractors reach for. It costs more and weighs more in your hands over a full day, but it cuts labor time significantly on large jobs.
- Random-orbit hand sander with dust shroud: useful for detail work, edges, and spots a pole sander can't reach comfortably.
Abrasive choice matters just as much as the tool. Mesh or net abrasives, like Mirka's Abranet line, let dust pass straight through the disc into the extractor instead of clogging the surface. That keeps airflow strong through a long sanding session, which is exactly what you want when you're leveling an entire ceiling. Paper discs work fine for hand sanding and touch-ups, but they load up with compound dust fast and lose cutting power. If you're running a machine, mesh is the better call every time.
What Vacuum Setup Actually Captures Drywall Dust?
The sander gets the credit, but the vacuum is doing the real work. A dust-extraction system paired with the right vacuum can capture a very high percentage of sanding dust and cut cleanup time compared with manual methods, according to Home Depot's product data on dust-free sanding systems. But not every vacuum is built for this. A standard shop vac filter traps larger debris and lets fine particulate straight through the exhaust, which means you could be blowing drywall dust right back into the room you're trying to keep clean.
HEPA-rated extraction is different. A true HEPA filter captures at least 99.97 percent of particles down to 0.3 microns, which covers the ultra-fine compound dust that standard filters miss. Professional tests find that high-end sanders paired with HEPA extractors and Automatic Filter Cleaning perform best for sustained suction and finish quality over a full job.
Automatic Filter Cleaning, or AFC, solves the problem that kills most DIY dust-extraction setups: clogging. As a filter loads up with fine dust, suction drops fast, sometimes within minutes of steady sanding. AFC pulses the filter clean on a set interval, which keeps airflow consistent instead of tapering off halfway through a wall.
Before you start sanding, run through this checklist:
- Confirm the hose fits snugly at both the sander port and the vacuum inlet. Gaps here leak suction and dust.
- Switch to mesh abrasives if you're running a machine sander. They resist clogging far better than paper discs.
- Test suction on a scrap piece of drywall before committing to the whole wall.
- Add a pre-separator or fine-dust collection bag ahead of the main filter to extend filter life.
- Check and change filters or bags at the first sign of reduced suction. Don't wait for total failure.
- Verify your extractor vents clean air, either outside through a hose or through certified HEPA filtration inside.
Pro Tip: Run your vacuum for 30 seconds on bare drywall before you start sanding for real. If you hear the motor straining or feel weak suction at the sander head, fix the hose seal or filter now, not after you've filled the room with dust.
How Should You Sand Drywall Without Cutting Through the Paper?
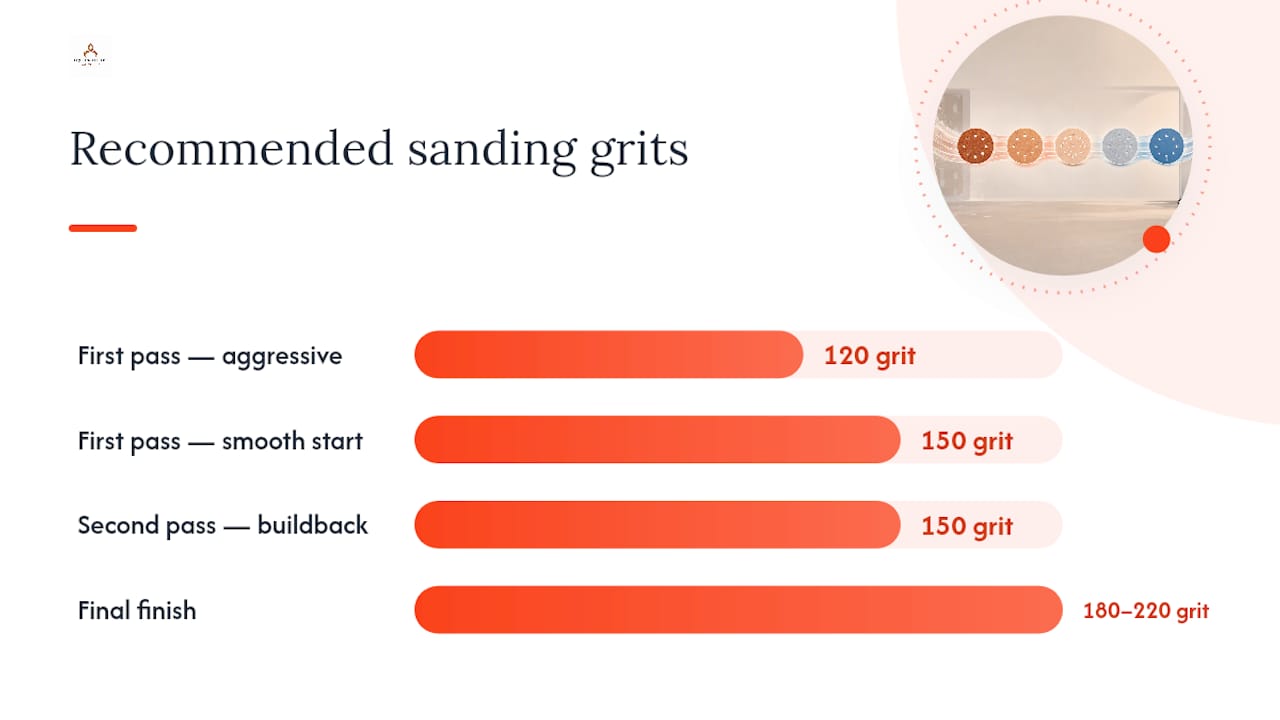
Grit progression is where most DIY sanding jobs go wrong, usually by skipping straight to a fine grit and wondering why the ridges won't disappear. The standard sequence for a paint-ready finish runs 120-grit to level ridges, 150-grit for general smoothing, then 180 to 220-grit before primer. Heavy texture removal or a rough patch might call for starting coarser, around 100-grit, but don't go below 120 on finished compound unless you're removing a serious high spot. Premium, high-gloss finishes benefit from finishing at 220 rather than stopping at 180, since that finer grit leaves fewer visible scratch lines under raking light.
Technique matters as much as grit choice. Use long, sweeping motions with light, even pressure rather than pressing hard and grinding in one spot. Overlap each pass by about a third to avoid leaving ridges between strokes. Drywall paper starts to fuzz or tear the moment you push too hard or linger too long in one place, and once you've cut through the paper face, you're patching, not sanding.
- Hold the sander at a slight angle rather than flat against the wall to avoid gouging.
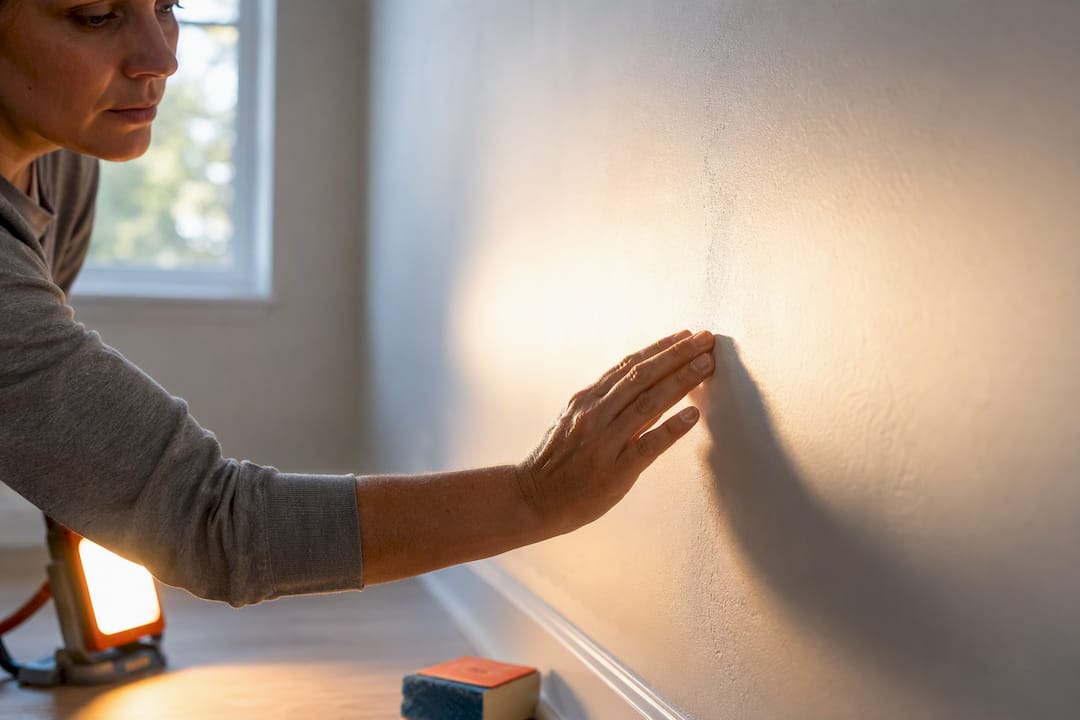
- Check your progress with a raking light (a work light held at a low angle) every few passes. It reveals shadows and high spots invisible under normal overhead lighting.
- Run a clean, bare hand over the surface periodically. Your fingertips catch subtle ridges and depressions that your eyes miss entirely.
- Save a fine hand-sanding pass with a 220-grit sponge for tight spots near switch plates, corners, and trim where a pole sander can't reach safely.
Wet sanding deserves a mention here because it solves the dust problem differently. A damp sponge run over joint compound produces almost no airborne dust at all, which makes it the right call for small repairs in occupied bedrooms or nurseries where you can't seal off the space completely. The tradeoff is drying time. Wet-sanded compound needs to dry fully before you can prime, and going back over a spot that's still damp can rehydrate the compound and smear it rather than smooth it. Save wet sanding for patches, not whole rooms, unless you're comfortable waiting out the dry time between passes.
Raking light and hand-feel checks aren't optional extras. Practical tradecraft from finish carpenters treats these two checks as essential steps precisely because they catch defects that would otherwise show up as flaws once paint hits the wall.
What PPE and Room Prep Do You Actually Need?
Drywall dust looks harmless, but joint compound contains talc, mica, and silica, and fine particles from these materials penetrate a standard paper dust mask without much resistance. Health agencies recommend a P100 respirator rather than a disposable dust mask for sanding tasks specifically because the fit and filtration are built for particulate this fine. A loose paper mask might stop the coarse stuff, but the material that actually causes long-term respiratory irritation slips right past it.
Containment turns a messy job into a manageable one. Before you start sanding a room:
- Hang plastic sheeting over doorways and tape the seams so dust doesn't migrate into hallways or adjoining rooms.
- Tape plastic or use magnetic vent covers over supply and return registers to keep dust out of your ductwork.
- Turn off your HVAC system entirely while sanding. A running blower will pull fine dust straight into your return and redistribute it through the whole house.
- Crack a window and run a box fan facing outward to create negative pressure, pulling dust out of the room rather than letting it drift.
Pro Tip: Tape a sheet of plastic loosely over the doorway rather than sealing it airtight. A slight gap near the bottom, combined with an exhaust fan in the window, actually improves airflow out of the room instead of trapping dust inside.
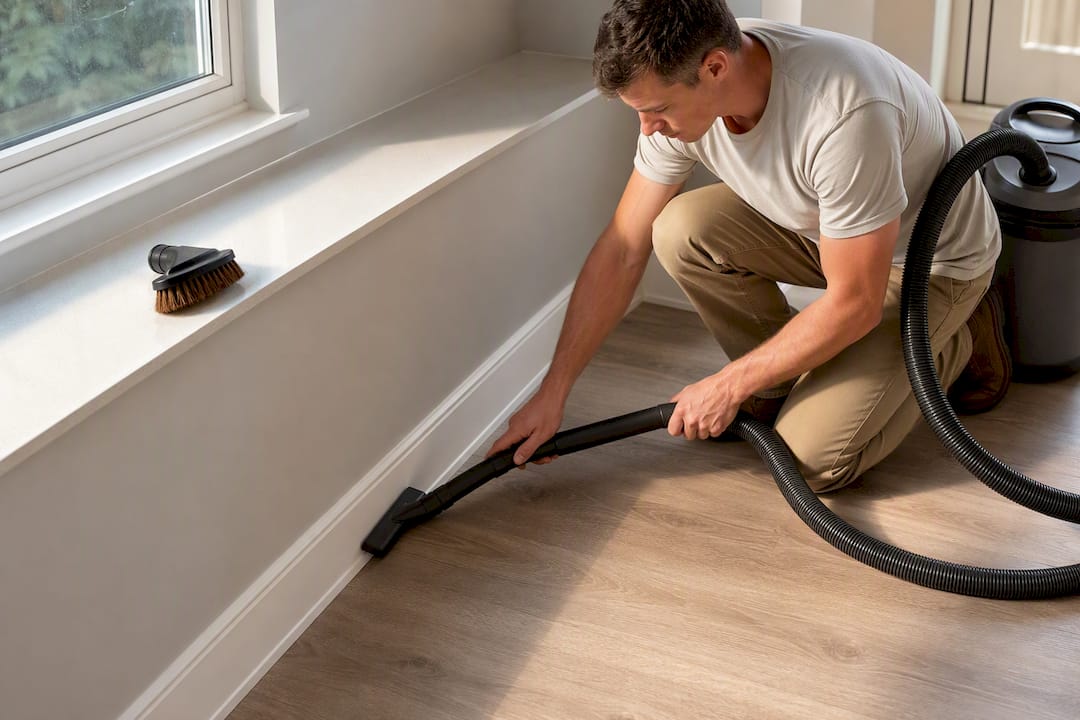
Cleanup order matters too. Vacuum surfaces first with a HEPA-filtered machine, working top to bottom. Follow with a damp wipe or tack cloth on walls and trim to catch what settled after the vacuum pass. Vacuum floors last. Never sweep drywall dust. A broom just re-aerosolizes the fine particles you worked so hard to contain, putting them right back in the air you're breathing.
A Step-by-Step Dustless Sanding Workflow
Running a real job in order keeps you from backtracking, and backtracking is where most of the dust exposure happens on DIY projects.
Before you sand:
- Confirm joint compound has cured fully. Sanding wet or half-dry compound gums up abrasives and wastes your setup.
- Clear or cover furniture and flooring near the work area with drop cloths.
- Seal the doorway with plastic sheeting and set up your exhaust fan in the window.
- Set up your extractor: check hose fit, load a mesh abrasive if you're using a machine, and test suction on scrap.
- Position a work light at a low, raking angle so you can see surface texture as you work, not just after you finish.
First pass:
Start at 120-grit if you're leveling fresh compound with visible ridges or trowel marks. If the compound already went on smooth and you're just knocking down minor texture, you can start at 150-grit and save a step. Move the sander in long, overlapping strokes, working with the extractor hose trailing behind you rather than dragging across the wall.
Second and final passes:
Step up to 150, then finish at 180 to 220-grit depending on your finish target. Switch to a hand sponge for inside corners, areas around outlets, and spots near trim where the pole sander's head is too bulky to maneuver safely. This is also where wet sanding earns its place if you're touching up a small area in a room you can't fully seal off.
Inspection and cleanup:
- Run the raking light over the entire surface, checking every angle.
- Feel across seams and patches with a clean hand to catch ridges the light missed.
- Spot-skim any low areas you find rather than trying to sand a depression level, which just thins the surrounding paper.
- HEPA vacuum the walls, ceiling, and trim.
- Damp wipe or tack-cloth the surface to pull remaining dust before priming.
- Vacuum the floor last, and resist the urge to grab a broom.
That sequence, done in order, is the difference between a smooth, paint-ready wall and a redo two weeks later when flat paint reveals every missed ridge.
Common Dustless Sanding Problems and How to Fix Them
Over-sanding shows up as a fuzzy, torn paper surface or a visible dip where you leaned too hard. The fix is a light skim coat over the damaged spot and a re-sand once it cures, not more sanding on the same area.
Suction loss is almost always a filter, bag, or hose problem. Work through it in order: check the filter for clogging first, then the collection bag, then the hose connections at both ends for gaps. A pre-separator ahead of your main filter and an AFC-equipped extractor solve this for good on bigger jobs, since tool-triggered vacuum operation and Automatic Filter Cleaning are the features that keep suction steady instead of tapering off mid job.
- Visible scratch or swirl patterns usually mean you jumped grits too fast. Drop back one step and re-sand with overlapping passes, or switch to hand-sanding with a fine sponge over the affected area.
- Rounded, uneven corners come from using a flat pad where a folded sponge or corner-specific head belongs. Corners need a tool shaped for the angle, not brute force from a flat sander.
- Clogged mesh abrasives on long runs usually mean it's time for a fresh sheet, not a stronger push against the wall.
Field-Proven Tips From Painting Professionals
Prep and cleanup make or break a sanding job, and that's the piece most DIYers underestimate. Experienced crews spend as much time containing dust and inspecting surfaces under raking light as they do running the sander itself, because a rushed sanding pass shows up under paint no matter how good the primer is.
Hiring a pro makes sense for large-scale jobs, high-gloss finishes where every scratch shows, or occupied homes where full containment isn't practical. Professional crews bring HEPA extractors, AFC-equipped machines, and the practiced eye to catch defects a first-timer would miss. If you want to go deeper on the prep side, our guides on prepping walls before repainting and matching drywall texture cover the steps that come right before and after sanding.
How Much Does Dustless Sanding Equipment Cost?
A basic sanding sponge or hand block runs a few dollars and gets small patch jobs done without any extraction system at all. A manual pole sander with a vacuum-compatible head typically costs somewhere in the $20 to $60 range, and you'll need a shop vac to pair with it if you don't already own one.
Powered pole sanders with a built-in dust port land in a wider range, generally $150 to $400 for consumer and prosumer models. Professional-grade sanders paired with a dedicated HEPA extractor and AFC, the kind contractors run all day, push well past $1,000 for the full kit once you add the extractor unit.
Mesh abrasive discs cost more per sheet than standard sandpaper, but they last longer on a machine because they resist clogging, which usually offsets the higher price over a full job. Pre-separators and fine-dust collection bags add a modest amount to your setup cost but extend filter life significantly, which matters if you're renting equipment by the day and want every hour of runtime you can get.
For a single room or a handful of patches, renting a powered sander and extractor for a day often costs less than buying, especially if this is a one-time project rather than something you'll repeat across multiple rooms or a whole house.
How Do You Maintain a Dustless Sanding Machine?
Suction problems are almost always maintenance problems in disguise. Filters need regular inspection, and on an AFC-equipped extractor, the automatic pulse-cleaning cycle handles routine buildup, but it doesn't replace periodically pulling the filter for a full manual clean or swap.
Check the hose for cracks or loose fittings before every job, since a small leak at the connection point bleeds suction just as effectively as a clogged filter. Empty collection bags or bins before they reach capacity rather than waiting until they're full, since an overloaded bin reduces airflow well before it looks completely packed.
Store mesh abrasive discs flat and dry between uses. Store the extractor itself with the filter seated properly and the hose disconnected to avoid stress on the connection points over time. A few minutes of maintenance between jobs keeps a machine running at full suction for years instead of losing performance after a handful of uses.
Is Dustless Sanding Better for the Environment?
Conventional dry sanding sends fine particulate into the air, where much of it eventually settles on every surface in the house, gets swept or wiped up, and ends up in household trash or down a drain during cleanup. That's more water used for wipe-downs and more waste generated overall compared with a contained system.
Vacuum-assisted sanding collects dust directly into a bag or bin, which means less airborne particulate settling on floors, furniture, and HVAC components, and less water needed for cleanup afterward. Filters and collection bags still become waste, but the volume is generally smaller and more contained than what a traditional sweep-and-wipe cleanup generates across an entire room.
The bigger environmental factor might be indoor air quality rather than landfill impact. Airborne drywall dust doesn't just settle on surfaces. It circulates through HVAC systems and gets breathed in by everyone in the house until it fully settles, which can take hours. A well-sealed dust-extraction setup keeps that particulate out of the air readers and their families are breathing in the first place.
How Do You Choose the Right Setup for Your Project?
Match your equipment to the actual size of the job, not the job you imagine yourself tackling someday. A single patch or two calls for a sanding sponge and maybe a damp cloth. Nothing more elaborate is worth the cost or setup time.
A full room, ceiling included, justifies a pole sander paired with a shop vac at minimum, and a powered sander with a dedicated extractor if you're working on a budget that allows for it. Multiple rooms or a whole-house sanding project is where the math tips toward either renting professional-grade equipment for a few days or hiring a contractor outright, since the labor and cleanup time on a DIY setup adds up fast across that much square footage.
Budget-conscious readers should prioritize the vacuum and filtration over the sander itself. A mediocre sander paired with a strong HEPA extractor and mesh abrasives will outperform a premium sander connected to a leaky, unfiltered shop vac every time. If you can only upgrade one piece of the system, upgrade the extraction side first.
Dustless vs. Traditional Sanding: What You Gain and What You Give Up
Dustless sanding wins decisively on cleanup time and air quality. Less dust settling on furniture, floors, and HVAC components means less time spent wiping down a house after the job wraps, and it means less fine particulate circulating through the air people are breathing during the work itself.
The tradeoffs are real, though. Vacuum-assisted setups cost more upfront, whether you're buying a shop vac and pole sander combo or renting a full HEPA and AFC kit. Hose management adds a slight learning curve, since you're maneuvering a sander with a trailing hose instead of a free hand tool. And no dustless system is perfectly dust-free. Some fine particulate escapes even the best setups, so containment and a P100 respirator remain necessary regardless of how good your extractor is.
Traditional dry sanding without extraction is cheaper and simpler to set up, which makes it tempting for a quick patch job. But the dust cost is steep: settling particulate throughout the room, extended cleanup time, and real respiratory exposure if you skip proper PPE. For anything beyond a small touch-up, the extraction route pays for itself in time saved and air quality alone.
Perspective: When DIY Makes Sense and When It Doesn't
Here's my honest read after digging through how these systems actually perform: DIY dustless sanding works great for small patches, a single bedroom, or a garage where a botched corner won't ruin your evening. Renting a pole sander and shop vac for a weekend costs a fraction of what a contractor charges, and the skills involved aren't hard to pick up on a small scale.
Where DIY starts to strain is occupied homes with multiple rooms, high-gloss finish targets, or any job where a scratch pattern under raking light would bother you for years. Professional crews carry HEPA extractors and AFC-equipped sanders that most homeowners will never own, and more importantly, they've developed the muscle memory to catch defects before paint goes on. If your project involves a whole house, a commercial space through Trupainting LLC's commercial interior services, or a finish level where mistakes are expensive to fix, the labor cost of a pro often beats the time and equipment cost of doing it yourself. For most residential jobs, our residential interior painting services team handles the sanding, prep, and finish work as one package, so you're not juggling rental returns and cleanup on top of the actual painting.
— Kyle
Sources
For safety guidance on airborne particulates, NIOSH's engineering controls resources cover respirator selection in more depth. Fine Homebuilding's sander testing coverage is worth a read if you're comparing professional-grade equipment. For low-dust renovation practices beyond drywall, One Day Doors & Closets' guide to low-dust door replacement offers useful parallels for working in occupied homes. And once sanding wraps, our own guide on cleaning up after a painting job walks through the final steps before primer goes on.
- Drywall sanding overview - Fine Homebuilding
- NIOSH engineering controls for silica and dust (CDC/NIOSH)
- Full Circle Dust-Free Sanding System FCI DUSTFREE - The Home Depot