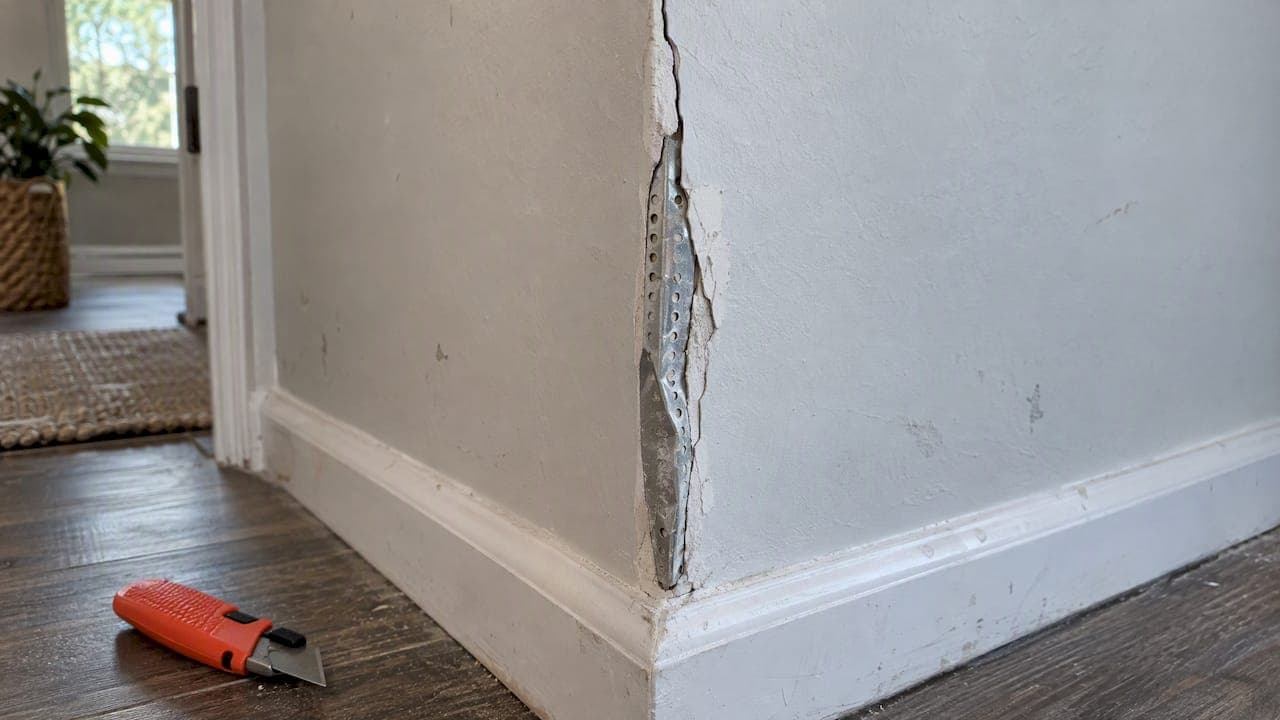
Most corner bead damage comes down to two cases. If only the joint compound is chipped or cracked, you scrape off the loose material and re-coat it. If the metal or plastic bead itself is bent, dented or loose, you stabilize it or cut out that section and set a new piece, then rebuild the corner with compound, sand it and prime it. This guide shows you how to tell which case you have, how each repair goes, and when it makes sense to hand the job to a pro before painting.
TL;DR
- Press the corner and look at it in side light. Chipped compound is a quick surface fix. A bent, dented or loose bead needs to be reset or replaced.
- A slightly dented metal bead can be tapped level and re-fastened. A bead that will not hold steady, or is damaged along much of its length, should be cut out and replaced.
- Build the corner with two or three thin coats of compound, each feathered wider than the last. Let each coat dry fully before the next.
- Sand lightly with 120-grit and then 150-grit paper, wipe off the dust, prime, and only then paint.
- Bullnose corners, corners around doorways and long damaged runs are where a professional finish pays off most.
Table of Contents
- Diagnose the corner before you touch it
- Tools and materials
- Repair 1: compound-only damage
- Repair 2: a slightly dented or loose bead
- Repair 3: cut out and replace a damaged section
- Bullnose corners and corners around openings
- Build up the corner with joint compound
- Texture, primer and paint
- Safety and common mistakes
- When to call a professional
- Our perspective
- Let us handle the corners and the paint
- FAQ
- Sources
Diagnose the corner before you touch it
The wrong repair is the most common reason a corner fails twice. A fresh coat of mud over a bent bead looks fine for a few weeks and then cracks along the same line. So start by finding out what actually broke.
A sharp knock can crack or chip the compound that covers a corner bead. A harder hit can dent or bend the metal or plastic edging underneath, according to HGTV's drywall repair guide. The practical difference is simple: damage limited to compound is a surface repair, while a bent bead means cutting out the damaged section instead of burying it in new mud.
Check the corner in three ways:
- Look along it. Hold a flashlight flat against the wall so the light rakes across the corner. Waves, dents and a corner that is no longer straight show up right away.
- Press it. Push gently along the corner with your thumb. If the bead flexes, clicks or moves, it has come loose from the framing or the compound that held it.
- Run a putty knife down it. Loose or hollow-sounding compound lifts away easily. Solid compound stays put.
Then sort what you see:
| What you find | What it means | Repair |
|---|---|---|
| Chips or hairline cracks in compound, bead is straight and solid | Surface damage only | Remove loose material, re-coat, sand |
| Small dent in a metal bead, bead still attached | Bead slightly deformed | Tap level, re-fasten, then build up compound |
| Bead loose along part of its length | Fasteners or compound bond failed | Re-secure, or cut out the loose section |
| Bent, crushed or rusted section | Bead is beyond saving in that spot | Cut out and replace that section |
| Damage along most of the corner | Patching will not last | Replace the whole piece |
Lowe's gives the same guidance in its corner bead how-to: patch a small damaged area with a cut-and-replace piece, and replace damaged pieces or the entire bead when the damage runs along its length.
If you also see hairline cracks running out from the corner along a seam, read our guide to hairline drywall seam cracks first. A seam crack and a corner bead failure are different problems, and they are fixed differently.
Tools and materials
Gather everything before you start, because joint compound does not wait for you to run to the store. Lowe's lists matching bead, joint compound, sandpaper, bead-appropriate fasteners or adhesive, primer and paint as materials. Its tool list includes tin snips, a hacksaw, knives, a drill/driver, a mud pan, a tape measure, gloves, safety glasses and a respirator.
A practical kit for most repairs:
- Replacement bead that matches the existing one. Metal, paper-faced metal and vinyl beads finish differently, so match what is on the wall.
- Taping knives in 4-, 6- and 10-inch widths. USG's installation guide calls for 4-, 6- and 8- or 10-inch knives, a mud pan, a sander and a sponge, according to its paper-faced metal bead guide.
- Tin snips or a hacksaw for cutting the bead. The Spruce also lists a metal file for knocking off burrs.
- Utility knife and pry bar or claw hammer for opening up the damaged area.
- Joint compound. Lowe's lists lightweight and all-purpose compound.
- 120- and 150-grit sandpaper or a drywall sanding sponge.
- Drywall nails or screws made for the bead you are installing.
- Primer and interior paint.
- Gloves, safety glasses and a respirator.
Repair 1: compound-only damage
This is the easy one. The bead is straight and firm, and only the covering has chipped or cracked.
- Scrape away every bit of loose or crumbling compound with a putty knife. Stop when you reach solid material.
- Wipe the area clean. USG's handbook notes that dust keeps tape and compound from bonding and can cause cracking or separation, so do not skip this.
- Apply a thin coat of compound with a 4-inch knife, pressing it into the damaged area and feathering the edges.
- Let it dry fully, sand lightly, and add a second coat with a wider knife if needed.
HGTV says that when the damage is limited to compound, you remove loose material and apply new compound, and no tape is needed over it.
Repair 2: a slightly dented or loose bead
A shallow dent in a metal bead does not always mean replacement. Sherwin-Williams' professional repair video page describes scraping away loose material, gently tapping the bead level or slightly below the drywall face, and re-securing it with drywall screws or nails if needed before building up compound layers. The key idea is to stabilize first. A bead that cannot be made stable should be replaced.
A few cautions from the manufacturers and the how-to sources:
- Do not strike the vertical edge of the bead with a hammer. The Spruce warns that nails driven there can bend the bead.
- Keep fastener heads flush. The Spruce notes screw heads that sit too proud interfere with mudding, and USG says to drive nail heads below the bead nose while avoiding dents.
- Do not flatten the flanges. USG advises keeping flanges from spreading beyond 90 degrees.
- Check the fastener type. USG's installation and finishing guide specifies nails through the flange holes about every 9 inches for its metal Dur-A-Bead and says screws are not recommended for that product. For other beads, follow the maker's instructions.
After the bead is stable, coat it as described in the finishing section below.
Repair 3: cut out and replace a damaged section
When the bead is bent, crushed or loose beyond saving, replace that section. A short run is a very manageable job.
Open up the damage
HGTV recommends cutting above and below the dented section with a metal-cutting hacksaw, cutting vertically around it with a utility knife, and removing the fasteners with a pry bar or claw hammer. Sherwin-Williams likewise says a bead beyond repair should be cut out with a hacksaw.

Protect the wall while you pry. HGTV advises placing a taping knife or thin plywood behind the pry tool so it does not lever against unsupported drywall and punch an extra hole. Take your time here. A corner repair that turns into a patch on both walls costs you far more effort than the bead itself.
Cut the new piece
Measure the opening and cut the replacement with straight-cut tin snips. Lowe's suggests test-fitting before installation, and for a full-height piece, subtracting one-half inch for ceiling and floor clearance. The Spruce adds two details: cut it to fit exactly, and file off burrs. Avoid bending the flanges while you handle it.
Set and fasten it
Spread a layer of compound slightly beyond where the bead will sit, then press the new piece into place. For metal bead, Lowe's says to align it level and plumb, and drive drywall screws or nails through the fastener holes with the heads flush. Sherwin-Williams describes securing a replacement metal bead with four drywall screws, two at each end, then covering it with two or three compound layers. The Spruce also says to re-fasten any loosened flanges above and below the repair.
For paper-faced bead, USG's repair how-to describes cutting out and prying away the damaged area, cutting a replacement with tin snips, embedding it in compound with a 4- to 6-inch knife, then adding another coat, sanding and repeating as needed. The installation guide says to embed it with a knife held at about a 45-degree angle and remove excess compound and air bubbles.

Bullnose corners and corners around openings
Rounded bullnose corners and the corners around doorways and window openings are the ones people ask about most, and they are less forgiving than a plain square corner.
Bullnose corners. Many bullnose corners are set in a bed of compound with fasteners only at the ends, so the compound is doing much of the holding. When one fails, you usually see a crack running down the rounded edge. The usual professional approach is to cut a clean line along the crack with a utility knife, a little way from the curve, remove the loose compound to expose the edge of the bead, re-secure it, and then re-coat. Because the curve is easy to flatten or gouge, work with a flexible knife and light passes. A small ding in a bullnose can often be filled. A long crack or a bead that has pulled away from the wall is a case for replacing the piece.

Corners around openings. Door and window corners take knocks from furniture, vacuum cleaners, moving boxes and kids. They also sit close to casing, so there is little room for a wide feathered finish. Where practical, remove the damaged bead, tuck the drywall as needed, fasten the new bead and then tape and coat it in several passes. If trim sits tight to the corner, score the paint and caulk line first so you do not tear paper or finish. If caulk lines nearby are splitting after painting, see our guide on caulk cracking after painting.
When the bead is vinyl or a specialty profile, match it exactly. A mismatched profile shows through paint no matter how good the mudding is.
Build up the corner with joint compound
What separates a repair you can see from one you cannot is how well the compound is applied. The rule is thin coats, wider each time, fully dry in between.
- First coat. Use a 4-inch knife. The Spruce recommends this width first, pressing compound into the edges and holes of the bead. USG says compound at an outside corner should extend roughly 2 inches on each side.
- Let it dry fully. Lowe's stresses that each coat dries completely before you add the next. Rushing here is what causes shrinkage cracks and bubbling.
- Second coat. Use a 6-inch knife and feather the edge beyond the first coat.
- Third coat if needed. The Spruce suggests a 10-inch knife, scraping or lightly sanding any ridges between coats.
- Sand. Lowe's recommends light sanding with 120-grit and then 150-grit paper. Wear a respirator and eye protection. The Spruce says to sand gently with a drywall sander after the final coat is dry, to leave a smooth surface for primer and paint.
- Clean up. Vacuum and wipe the dust off the wall before priming.
One caution: sanding a corner too hard will expose the bead or scuff the paper on the neighboring wall. Light pressure and a fine grit do the work.
Texture, primer and paint
If the walls around the corner are textured, a smooth patch will show through paint. Our guide on matching drywall texture walks through the options. Whatever the texture, prime the whole repair before painting. Fresh compound absorbs paint differently from the wall around it, and unprimed patches show up as dull, flat spots, a problem called flashing.
Then paint the whole wall face, corner to corner, rather than dabbing at the repair. If you are repainting a room anyway, our interior painting sequence shows where corner repairs belong in the order of work.
Safety and common mistakes
- Wear protection. Lowe's recommends gloves when handling metal bead, and safety glasses and a respirator when sanding.
- Mind the pry tool. Back it with a knife or plywood so you do not punch through the wall.
- Keep fastener heads flush. Raised heads catch the knife and leave ridges.
- Do not bury a bent bead. Mud over damage hides it for a short while only.
- Skip no dry times. Wet compound under a second coat shrinks and cracks.
- Follow the manufacturers' instructions. Compound and bead products differ, and the label wins.
- Mind older homes. If you are sanding or scraping in an older house with questionable paint or compound, stop and have it tested before creating dust. The EPA's lead-safe rules for renovation exist because of that risk, so ask a certified professional.
When to call a professional
A single dinged corner is a reasonable weekend repair. Other situations are better handled by a crew with the right tools and a trained eye:
- Several corners are damaged, or one long run needs replacing.
- The bead keeps cracking in the same place, which can point to movement, moisture or a framing problem.
- You have bullnose corners, vaulted ceilings or tall stairwells.
- The room needs texture matching, priming and repainting afterward.
- You are preparing a home for sale, or a rental, a clinic or an office, on a deadline.
If you are weighing repair against bigger work, our repair-or-replace checklist helps you decide, and our drywall repair cost guide shows what homeowners should budget. If nail heads are popping near the corner too, see drywall nail pops.
Our perspective
We repair corner bead as part of nearly every interior project, and the lesson is always the same: the paint only looks as good as the corner underneath it.
Our approach starts with preparation. We check whether the bead is solid, fix what is actually wrong, and build the corner in thin, fully dried coats so it does not telegraph through the finish. Preparation is where we put our time, and it is why we offer three levels of service: a Cosmetic Refresh for homes that need a clean, updated look, Enhanced Prep & Durability for more repair and protection, and Maximum Prep & Protection for the most thorough preparation.
We would rather tell you that a corner needs to be replaced than cover it up and hope. We compete on lasting value, not on being the cheapest, and we stand behind our workmanship with warranties.
Kyle
Let us handle the corners and the paint
If you would rather not spend a weekend mudding and sanding, we can take care of drywall repairs and the painting that follows, so the corners and the walls finish as one clean job. We serve homeowners, retirement communities and business owners across Lake County and Central Florida. Explore our residential interior painting or compare our three service packages, then schedule your appointment.

We bid each job by scope, so you know what is included before work begins. Learn more on our home page.
FAQ
Can I repair corner bead without replacing it?
Yes, when the bead is straight and firmly attached. Chipped compound can be scraped and re-coated, and a slightly dented metal bead can be tapped level and re-fastened. If the bead is bent, crushed or will not hold steady, cutting out that section is the repair that lasts.
How many coats of joint compound does a corner need?
Two or three thin coats is typical. The Spruce suggests a 4-inch knife for the first coat, a 6-inch knife for the second, and a 10-inch knife for a third if needed. Let each coat dry fully and sand lightly before priming.
Do I screw or nail the new bead?
It depends on the bead. Lowe's says screws or nails through the fastener holes with heads flush are fine for metal bead, while USG specifies nails and says screws are not recommended for its Dur-A-Bead. Check the instructions for your product.
Why does my corner keep cracking in the same spot?
The most common cause is a bent or loose bead hidden under compound, so the corner keeps moving. Compound applied too thick or before the previous coat dried can also crack. If the cracks keep returning after a proper repair, have a drywall or painting professional look for movement or moisture.
Do I need to prime a repaired corner?
Yes. Lowe's includes primer in the standard repair sequence. Primer seals the fresh compound so the paint dries evenly and the repair does not show as a dull patch.
Sources
- How to Fix Corner Bead: A Step-by-Step Guide, Lowe's
- Six Ways to Fix Holes and Cracks in Drywall, HGTV
- How to Repair a Metal Corner Bead on a Wall, The Spruce
- Sheetrock Brand Paper-Faced Metal Bead Trim Installation Guide, USG
- Sheetrock Brand Installation and Finishing Guide, USG
- USG Surfaces and Finishes: How-To Repair Guides
- Manufactured Housing Handbook, USG
- Repair and Touch Up Video for Professionals, Sherwin-Williams